负载均衡常用软件及算法

目录
  1. 负载均衡组件
  2. 负载均衡策略
  3. 服务可用性探测

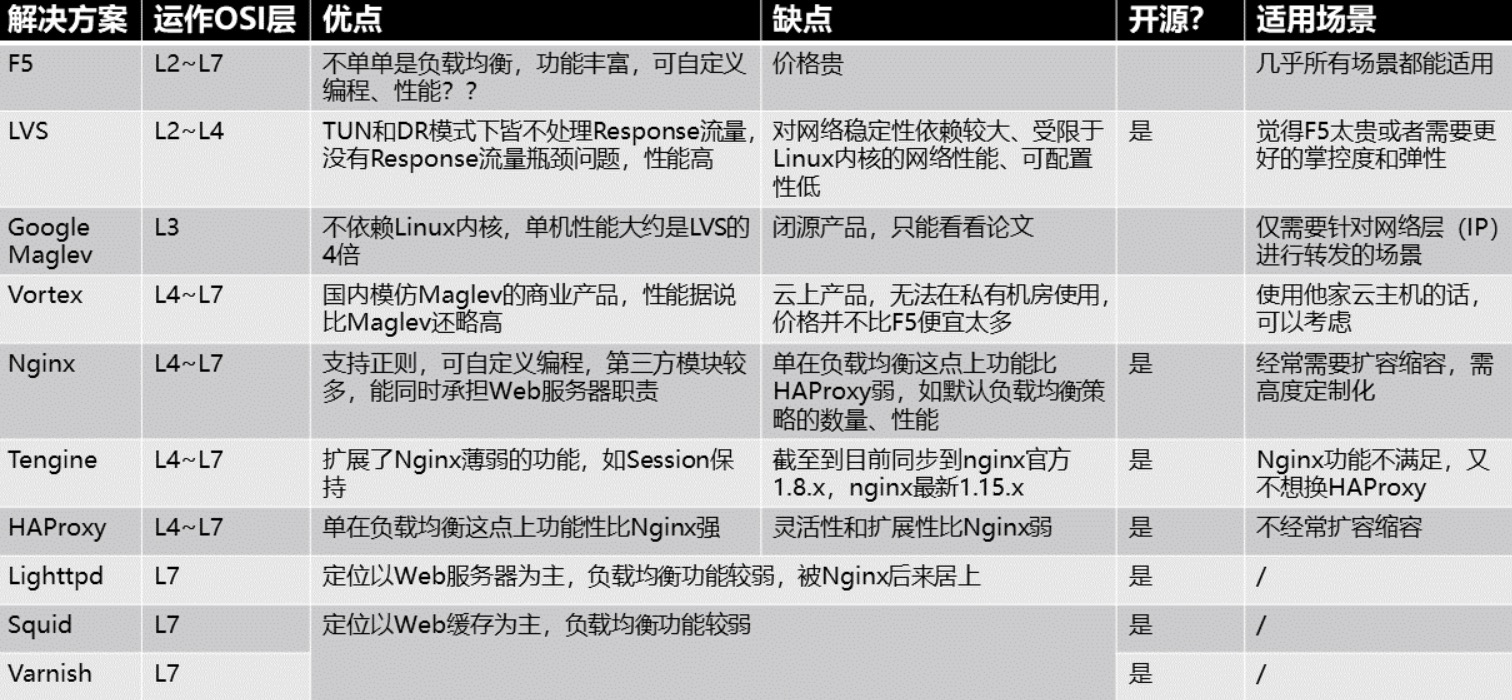
负载均衡组件

  • 硬件负载均衡-F5,流量百万级
  • 传输层负载均衡-LVS,十万级
  • 应用层负责均衡-nignx,万级
  • NAT技术其实也是一种负载均衡

load_balance

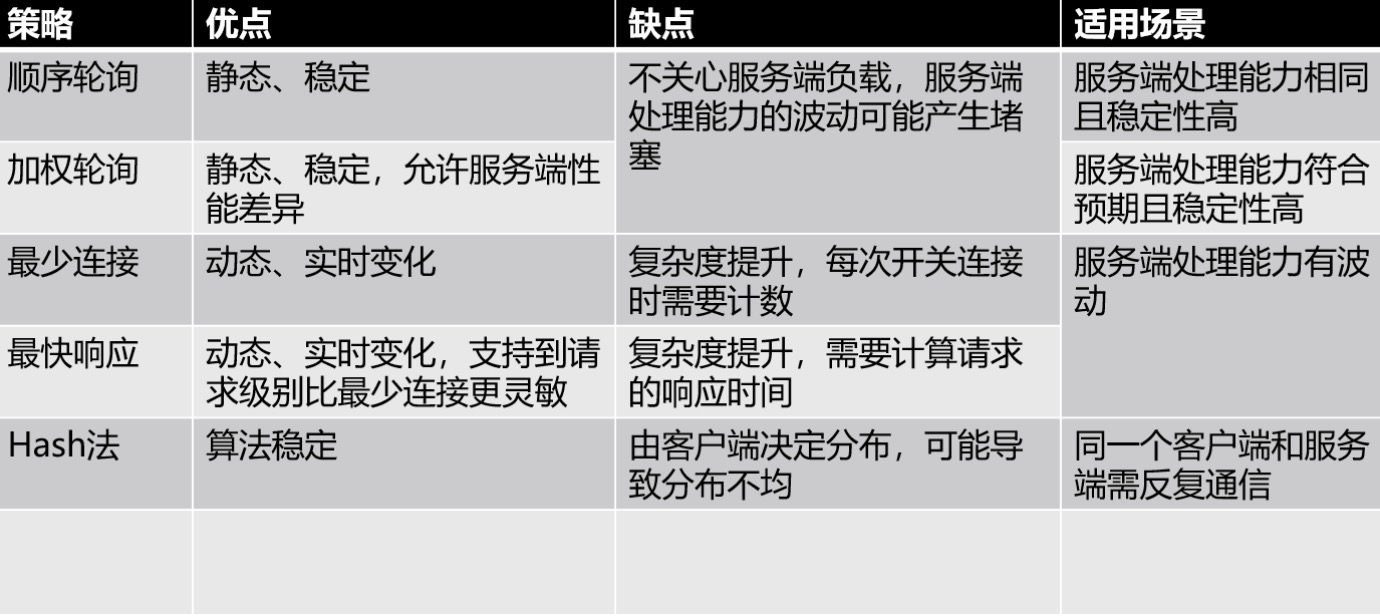
负载均衡策略

  • 轮询
  • weight round robbin
  • random
  • 最少连接数(需要清楚服务端状态,属于动态负载均衡)
  • 最快响应(需要记录不同机器上服务的响应速度,属于动态负载均衡)
  • hash(可以实现有状态的调度)

lb_algorithm

服务可用性探测

  • HTTP探测

    使用Get/Post的方式请求服务端的某个固定的URL,判断返回的内容是否符合预期。一般使用Http状态码、response中的内容来判断。
    
  • TCP探测

    基于Tcp的三次握手机制来探测指定的IP + 端口(握手成功后马上发一个rst
    请求断开连接[可以使用linger选项])。最佳实践可以借鉴阿里云的SLB机制
    值得注意的是,为了尽早释放连接,在三次握手结束后立马跟上RST来中断TCP连接。
    
  • UDP探测

    可能有部分应用使用的UDP协议。在此协议下可以通过报文来进行探测指定的IP + 端口。最佳实践同样可以借鉴阿里云的SLB机制
    结果的判定方式是:在服务端没有返回任何信息的情况下,默认正常状态。否则会返回一个ICMP的报错信息。
    

下面的几篇文章还不错,mark下:
分布式系统关注点——仅需这一篇,吃透「负载均衡」妥妥的
分布式系统关注点——「负载均衡」到底该如何实施?

服务器一些常用的运维命令

目录
  1. CPU
  2. Memory
  3. I/O
  4. 查看某个进程的线程数

CPU

top -n N -d interval #查看cpu使用率前N高的进程,没个interval/s刷新显示
pidstat -u -p $pid update_interval #-u指的是Report CPU utilization
ps

Memory

vmstat
cat /proc/meminfo #可以查看内存,swap分区等的使用情况
pidstat -r -p $pid update_interval #-r指的是Report page faults and memory utilization.
ps

I/O

iostat -d update_interval
pidstat -d -p $pid update_interval #-d指的是Report I/O statistics (kernels 2.6.20 and later only).

查看某个进程的线程数

cat /proc/$pid/status |grep Thread
pstree -p $pid
ps -xH #可以进一步使用grep过滤

tips:
pidstat是个很好用的命令,详情请man pidstat查看

levelDB

目录
  1. Reads And Writes
  2. Atomic Update
  3. Concurrency
  4. Iteration
  5. Snapshots
  6. Slice
  7. Comparators
  8. Performance

#levelDB简介
LevelDB is a fast key-value storage library written at Google that provides an ordered mapping from string keys to string values.

source code: google/leveldb
具体特性参考上面的Github说明页。

levelDB使用说明文档

#示例操作

1
2
3
4
5
6
7
8
9
10
11
12
13
14
15
16
17
18
19
20
21
22
23
24
25
26
27
28
29
30
31
32
33
34
35
36
#include "leveldb/db.h"
#include "leveldb/write_batch.h"
#include <iostream>
using namespace std;
int main()
{
leveldb::DB *db;
leveldb::Options options;
options.create_if_missing = true;
leveldb::Status status = leveldb::DB::Open(options, "/tmp/testdb", &db);
assert(status.ok());
//Reads And Writes
leveldb::Status s = db->Put(leveldb::WriteOptions(), "os", "mac os");
if(!s.ok())
{
cerr << s.ToString() << endl;
delete db;
return -1;
}
string value;
s = db->Get(leveldb::ReadOptions(), "os", &value);
if(!s.ok())
{
delete db;
return -1;
}
cout << "os: " << value << endl;
//Atomic Updates
delete db;
return 0;
}

#源码分析

Reads And Writes

read – Get
Get操作支持区间查找’Approximate Sizes’

1
2
3
4
5
leveldb::Range ranges[2];
ranges[0] = leveldb::Range("a", "c");
ranges[1] = leveldb::Range("x", "z");
uint64_t sizes[2];
leveldb::Status s = db->GetApproximateSizes(ranges, 2, sizes);

write – Put
其中Write操作又分为Synchronous Writes和asynchronous writes

Atomic Update

使用leveldb::WriteBatch类实现

Concurrency

leveldb支持单进程中多线程的并发,不支持多进程之间的并发.

Iteration

迭代器遍历levelDB

Snapshots

Slice

leveldb存储类型的底层实现为一个Slice结构

Comparators

支持自定义Comparators来对k/v进行排序

Performance

底层存储技术涉及memtable, sstable,Compression, Cache

##Filter

参考资料:
LevelDB Cache实现机制分析

使用future等待一次性事件

目录

可以使用std::async来启动一个异步任务,其返回一个std::future对象。std::future对象最终将持有函数的返回值。当你需要这个值时,只要在future上调用get(),线程就会阻塞直到future就绪,返回该值。

1
2
3
int func();
std::future<int> answer = std::async(func);
answer.get();

c++11 condition_variable(条件变量)和读写锁(boost::share_mutex)

目录
  1. condtion_variable

condtion_variable

标准C++库提供了两个条件变量的实现:std::condition_variable和std::condition_variable_any。两者都需要和互斥元一起工作,以便提供恰当的同步。
以std::condition_variable为例,使用方法(以生产者消费者模型为例)如下:

1
2
3
4
5
6
7
8
9
10
11
12
13
14
15
16
17
18
19
20
21
22
23
24
25
26
27
28
29
std:mutex _mutex;
std::condition_variable data_cond;
std::queue<data_chunk> data_queue;
void producer()
{
while(1)
{
data_chunk const data = prepare_data();
std::lock_guard(std::mutex) lg(_mutex);
data_queue.push(data);
data_cond.notify_one();
}
}
void comsumer()
{
while(1)
{
std::unique_lock<std::mutex> uk(_mutex); //condition_variable should be used with unique_lock
data_cond.wait(uk, []{return !data_queue.empty();})
//after wake up
data_chunk data=data_queue.front();
data_queue.pop();
uk.unlock();
process(data);
}
}

#share_mutex
对于写操作,使用std::lock_guard和std::unique_lock加写锁,进行独占访问。
对于读操作,使用boost::shared_lock 加读锁,允许多个读者同时进行读取。

std::lock_guard和std::unique_lock的差别

目录
  1. lock_guard
  2. unique_lock
  3. unique_lock和lock_guard的区别

lock_guard

std::lock_guard使用起来比较简单,其在构造函数中对std::mutex变量进行锁定,在其析构函数中对std::mutex变量进行解锁,整个类没有对mutex进行解锁和加锁的对外接口,其源码如下:

1
2
3
4
5
6
7
8
9
10
11
12
13
14
15
16
17
18
19
20
21
22
23
template <class _Mutex>
class _LIBCPP_TYPE_VIS_ONLY lock_guard
{
public:
typedef _Mutex mutex_type;
private:
mutex_type& __m_;
public:
_LIBCPP_INLINE_VISIBILITY
explicit lock_guard(mutex_type& __m)
: __m_(__m) {__m_.lock();}
_LIBCPP_INLINE_VISIBILITY
lock_guard(mutex_type& __m, adopt_lock_t)
: __m_(__m) {}
_LIBCPP_INLINE_VISIBILITY
~lock_guard() {__m_.unlock();}
private:
lock_guard(lock_guard const&);// = delete;
lock_guard& operator=(lock_guard const&);// = delete;
};

使用方法如下:

1
2
3
4
5
6
7
8
std::mutex g_mutex;
int g_var = 0;
void test_guard()
{
std::lock_guard<std::mutex> guard(g_mutex);
g_var ++;
}

unique_lock

unique_lock相比lock_guard,功能要多很多,其提供了对mutex的加锁(lock和try_lock)和解锁(unlock)操作,同时可以配合条件变量condition_variable使用:

1
2
3
4
5
6
7
8
9
10
11
12
13
14
15
16
17
18
19
20
21
22
23
24
25
26
27
28
29
30
31
32
33
34
35
36
37
38
39
40
41
42
43
44
45
46
47
48
49
50
51
52
53
54
55
56
57
58
59
60
61
62
63
64
65
66
67
68
69
70
71
72
73
74
75
76
77
78
79
80
81
82
83
84
85
86
87
88
89
90
91
92
93
94
95
96
97
template <class _Mutex>
class _LIBCPP_TYPE_VIS_ONLY unique_lock
{
public:
typedef _Mutex mutex_type;
private:
mutex_type* __m_;
bool __owns_;
public:
_LIBCPP_INLINE_VISIBILITY
unique_lock() _NOEXCEPT : __m_(nullptr), __owns_(false) {}
_LIBCPP_INLINE_VISIBILITY
explicit unique_lock(mutex_type& __m)
: __m_(&__m), __owns_(true) {__m_->lock();}
_LIBCPP_INLINE_VISIBILITY
unique_lock(mutex_type& __m, defer_lock_t) _NOEXCEPT
: __m_(&__m), __owns_(false) {}
_LIBCPP_INLINE_VISIBILITY
unique_lock(mutex_type& __m, try_to_lock_t)
: __m_(&__m), __owns_(__m.try_lock()) {}
_LIBCPP_INLINE_VISIBILITY
unique_lock(mutex_type& __m, adopt_lock_t)
: __m_(&__m), __owns_(true) {}
template <class _Clock, class _Duration>
_LIBCPP_INLINE_VISIBILITY
unique_lock(mutex_type& __m, const chrono::time_point<_Clock, _Duration>& __t)
: __m_(&__m), __owns_(__m.try_lock_until(__t)) {}
template <class _Rep, class _Period>
_LIBCPP_INLINE_VISIBILITY
unique_lock(mutex_type& __m, const chrono::duration<_Rep, _Period>& __d)
: __m_(&__m), __owns_(__m.try_lock_for(__d)) {}
_LIBCPP_INLINE_VISIBILITY
~unique_lock()
{
if (__owns_)
__m_->unlock();
}
private:
unique_lock(unique_lock const&); // = delete;
unique_lock& operator=(unique_lock const&); // = delete;
public:
#ifndef _LIBCPP_HAS_NO_RVALUE_REFERENCES
_LIBCPP_INLINE_VISIBILITY
unique_lock(unique_lock&& __u) _NOEXCEPT
: __m_(__u.__m_), __owns_(__u.__owns_)
{__u.__m_ = nullptr; __u.__owns_ = false;}
_LIBCPP_INLINE_VISIBILITY
unique_lock& operator=(unique_lock&& __u) _NOEXCEPT
{
if (__owns_)
__m_->unlock();
__m_ = __u.__m_;
__owns_ = __u.__owns_;
__u.__m_ = nullptr;
__u.__owns_ = false;
return *this;
}
#endif // _LIBCPP_HAS_NO_RVALUE_REFERENCES
void lock();
bool try_lock();
template <class _Rep, class _Period>
bool try_lock_for(const chrono::duration<_Rep, _Period>& __d);
template <class _Clock, class _Duration>
bool try_lock_until(const chrono::time_point<_Clock, _Duration>& __t);
void unlock();
_LIBCPP_INLINE_VISIBILITY
void swap(unique_lock& __u) _NOEXCEPT
{
_VSTD::swap(__m_, __u.__m_);
_VSTD::swap(__owns_, __u.__owns_);
}
_LIBCPP_INLINE_VISIBILITY
mutex_type* release() _NOEXCEPT
{
mutex_type* __m = __m_;
__m_ = nullptr;
__owns_ = false;
return __m;
}
_LIBCPP_INLINE_VISIBILITY
bool owns_lock() const _NOEXCEPT {return __owns_;}
_LIBCPP_INLINE_VISIBILITY
_LIBCPP_EXPLICIT
operator bool () const _NOEXCEPT {return __owns_;}
_LIBCPP_INLINE_VISIBILITY
mutex_type* mutex() const _NOEXCEPT {return __m_;}
};
unique_lock和lock_guard的区别

简单的说,unique_lock相对于lock_guard,会有更多特性。
unique_lock和lock_guard都遵循RAII。

unique_lock和lock_guard最大的不同是unique_lock不需要始终拥有关联的mutex,而lock_guard始终拥有mutex。这意味着unique_lock需要利用owns_lock()判断是否拥有mutex。另外,如果要结合使用条件变量,应该使用unique_lock。

Lock doesn’t have to taken right at the construction, you can pass the flag std::defer_lock during its construction to keep the mutex unlocked during construction.

We can unlock it before the function ends and don’t have to necessarily wait for destructor to release it, which can be handy.

You can pass the ownership of the lock from a function, it is movable and not copyable.

It can be used with conditional variables since that requires mutex to be locked, condition checked and unlocked while waiting for a condition.
参考[StackOverflow]:https://stackoverflow.com/questions/6731027/boostunique-lock-vs-boostlock-guard

#使用建议和说明
如果只是在某个区间进行简单的对象互斥访问的话,建议使用unique_gurad,这个比unique_lock来的更高效;如果在操作过程中涉及对锁对象的解锁和加锁操作的话,或者是使用了条件变量的情况下,使用uique_lock才能满足你的要求。

数据库的并发控制方法

1、数据库锁
根据事务的隔离性,调整不同的锁粒度(对行,数据块或表进行加锁)
2、写时复制COW
原理:对于写操作单独复制一份B+树丛叶子节点到根节点的路径,修改后再切换复制节点的根节点指向。具体步骤如下:

  • 拷贝:将从叶子到根节点路径上的所有节点拷贝一份
  • 修改:基于拷贝的节点进行修改
  • 提交:原子地切换根节点的指针,使之指向新的根节点(同时旧的节点会根据维护的引用计数情况是否为0,觉得是否进行垃圾回收)
    优点:读操作不用加锁,极大提升了读取性能
    缺点:每次写操作都需要拷贝从叶子到根结点路径上的所有节点,写操作成本高;另外,不支持多个写操作并发

3、多版本MVCC
原理:对每行数据维护多个版本,无论事务的执行时间有多长,MVCC总是能够提供与事务开始时刻相一致的数据。实际是增加了俩个隐式列:行被修改的”时间”和行被删除的”时间”(这个时间实际上是一个递增的唯一事务号)。对于每一次查询,会把当前事务的事务号同行存储的事务号进行对比,然后结合不同的事务隔离级别,来决定是否返回该行。
优点:
读取数据不需要加锁,每个读事务只获取自己的事务版本,大大提高了并发度;可以支持多个写事务并发
缺点:
需要额外存储多个版本数据;需对多个版本数据进行维护,定时删除不需要的版本,回收空间
根据这个原理,select/delete/update/insert语句的行为如下:

  • select
    进行select操作时需要满足,才能返回数据
    1) 行的修改版本号小于等于该事务号
    2) 行的删除版本号要么没定义,要么大于事务的版本号(表示数据在未来被其他事务删除)
  • delete
    更改行的删除版本号为当前事务号
  • update
    将原来的行复制一份,更改行的修改版本号为当前事务号
  • insert
    设置行的修改版本号为当前事务号

分布式存储系统

目录
  1. 分类
  2. 存储引擎
  3. 索引分类
  4. 容错和故障恢复
  5. 负载均衡

分类

根据处理数据类型划分:
-分布式文件系统:非结构化数据
-分布式键值(K-V):半结构化数据,分布式键值系统是分布式表格系统的简化实现
-分布式表格:半结构化数据
-分布式数据库:结构化数据

存储引擎

哈希存储引擎:Bitcask
B-树存储引擎:InnoDB MySQL

索引分类

聚集索引

一级索引和二级索引

容错和故障恢复

P37 故障恢复
容错方式:Master-slave架构
Data Server数据备份

负载均衡

负载均衡软件:
LVS
Haproxy
分级存储:合理利用SSD/SAS/SATA磁盘
功耗:I/O密集型和CPU密集型
计算数据的hash值,然后分布到不同的bucket中

思维导向图工具
向量时钟
数据回传
Merkle树
冲突处理等复杂的P2P技术

paxos数据复制
俩阶段提交协议?
LinuxHA软件?实现高可用
Zookeeper协议

谈谈kernel待机及唤醒

目录
  1. 内核待机和唤醒代码分布
  2. 待机及唤醒流程分析
  3. 如何统计模块唤醒时长

内核待机和唤醒代码分布

  1. kernel/power
  2. drivers/base/power

待机及唤醒流程分析

可以查看我的csdn博客Linux Kernel and Android 休眠与唤醒(中文版)

如何统计模块唤醒时长

废话不多说,直接贴代码:

drivers/base/power/main.c

1
2
3
4
5
6
7
8
9
10
11
12
13
14
15
16
17
18
19
20
21
static int dpm_run_callback(pm_callback_t cb, struct device *dev,
pm_message_t state, char *info)
{
ktime_t calltime;
int error;
if (!cb)
return 0;
calltime = initcall_debug_start(dev);
pm_dev_dbg(dev, state, info);
trace_device_pm_callback_start(dev, info, state.event);
error = cb(dev);
trace_device_pm_callback_end(dev, error);
suspend_report_result(cb, error);
initcall_debug_report(dev, calltime, error, state, info);
return error;
}

具体看下initcall_debug_start及initcall_debug_report两个函数的定义:

1
2
3
4
5
6
7
8
9
10
11
12
13
14
15
16
17
18
19
20
21
22
23
24
25
26
27
28
static ktime_t initcall_debug_start(struct device *dev)
{
ktime_t calltime = ktime_set(0, 0);
if (pm_print_times_enabled) {
pr_info("calling %s+ @ %i, parent: %s\n",
dev_name(dev), task_pid_nr(current),
dev->parent ? dev_name(dev->parent) : "none");
calltime = ktime_get();
}
return calltime;
}
static void initcall_debug_report(struct device *dev, ktime_t calltime,
int error, pm_message_t state, char *info)
{
ktime_t rettime;
s64 nsecs;
rettime = ktime_get();
nsecs = (s64) ktime_to_ns(ktime_sub(rettime, calltime));
if (pm_print_times_enabled) {
pr_info("call %s+ returned %d after %Ld usecs\n", dev_name(dev),
error, (unsigned long long)nsecs >> 10);
}
}
本站总访问量